If you are behind a forward proxy server and need to perform tasks that access the internet (such as installing MyST Studio), you will need to setup the forward proxy server settings.
Note: Throughout this article the '\' character is sometimes escaped as '%5c'.
Forward Proxy Configurations
Shell
Note: This level of configuration is for the current shell only, you can permanently apply this configuration in ~/.bashrc or ~/.bash_profile.
Steps
export http_proxy='http://<Domain>%5C<Username>:<Password>@<ProxyHost>:<ProxyPort>'
export https_proxy='<Protocol>://<Domain>%5C<Username>:<Password>@<ProxyHost>:<ProxyPort>'
export no_proxy="127.0.0.1, localhost,<CiServerIPHostName>,<CiServerIP>"
Testing HTTP
wget http://dev.mysql.com/get/mysql57-community-release-el6-9.noarch.rpm
If the file is downloaded successfully, the proxy configuration is setup correctly. Now you can remove the file.
Testing HTTPS
wget https://github.com/docker/compose/releases/download/1.14.0/docker-compose-$(uname -s)-$(name -m)
If the file is downloaded successfully, the proxy configuration is setup correctly. Now you can remove the file.
Yum
Note: This level of configuration is for yum only.
Steps
vi /etc/yum.conf

proxy=http://<ProxyHost>:<ProxyPort>
proxy_username=<Username>
proxy_password=<Password>
Testing
Install xclock to test yum internet connectivity.
sudo yum install xclock
Docker
Note: This level of configuration is for the docker service only and doesn't automatically apply the proxy configuration to the docker container (e.g. /bin/bash).
Steps
cat <<EOF | sudo tee -a /etc/sysconfig/docker
http_proxy='http://<Domain>%5C<Username>:<Password>@<ProxyHost>:<ProxyPort>'
https_proxy='<Protocol>://<Domain>%5C<Username>:<Password>@<ProxyHost>:<ProxyPort>'
EOF
Note: The no_proxy configuration is not required here. The docker service uses these proxy settings to pull images from internet, and docker won't be communicating to the CI server (or any internal servers). However, there should be no harm setting no_proxy.
sudo sed -i '/\[Service\]/a EnvironmentFile=/etc/sysconfig/docker' /usr/lib/systemd/system/docker.service
sudo systemctl daemon-reload
sudo service docker restart
Testing
Run command 'docker info' and check the Http Proxy and Https Proxy settings where '\' backslash is replaced with '%5C'.
Run a command where docker requires internet activity (e.g. /opt/app/myst-studio/bin/start.sh). If successful then the proxy is configured correctly.
Jenkins (For NTLM Forward Proxy)
Note: This level of configuration is for Jenkins only, this proxy setting doesn't automatically apply on any other applications.
Steps (For NTML Forward Proxy Only)
Jenkins cannot communicate to proxy server that requires NTML Authentication. The solution is to force the JVM to enable "basic" authentication (Not NTML Authentication).
For information regarding NTML Authentication Issue:
- java - Jenkins proxy 407 error - Stack Overflow
- [JENKINS-3350] Connect to update center via HTTP proxy that requires NTLM authentication - Jenkins JIRA
The solution to this problem is to modify the jenkins yml file:
vi $MYSTSTUDIO_HOME/conf/ci/docker-compose-base.yml
Add the following line after the Port definition:
environment:
* JAVA_OPTS=-Dhttp.auth.preference="basic"
The Jenkins JVM will use basic authentication to the proxy, not NTLM authenication.
Once the yml file is modified, run /myst-studio/bin/restart.sh to bounce the jenkins container (This will also bounce all other docker containers).
Steps (For Any Forward Proxy)
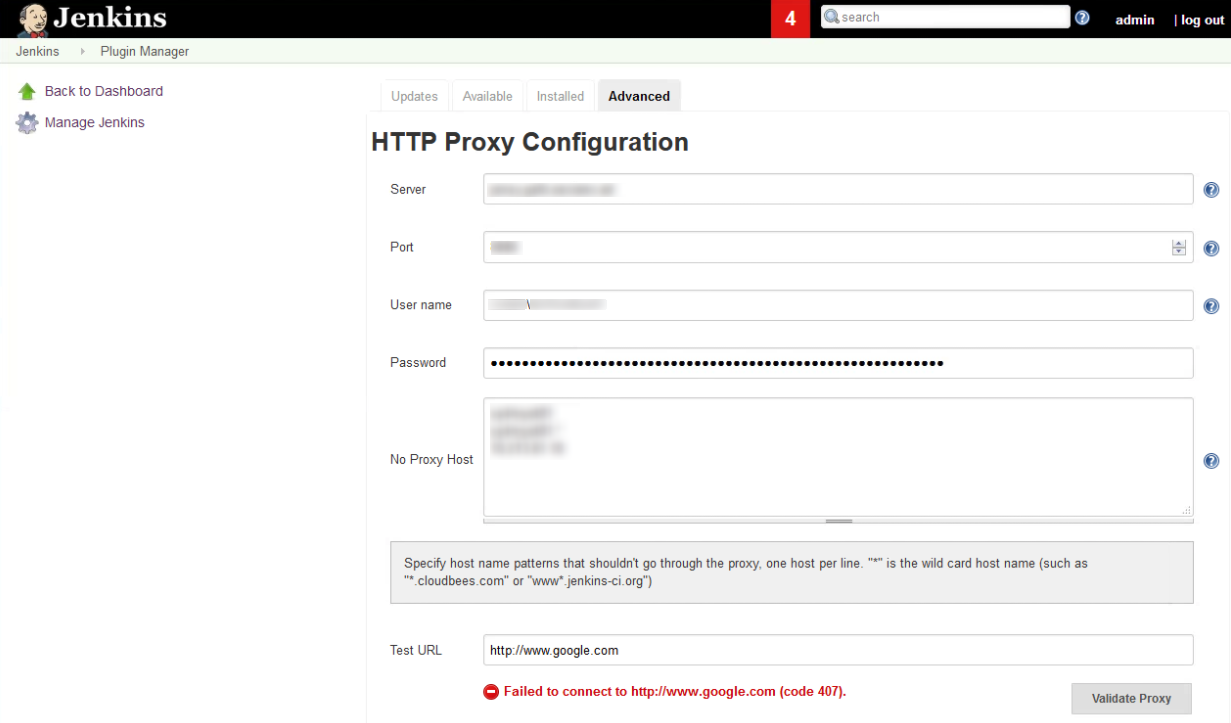
Provide the proxy configuration in the Jenkins console. For example:
Note: The Advanced > Validate Proxy button will return "Failed to connect to http://www.google.com (code 407).", but the connection should still work. Simply ignore this error.
Testing
- Jenkins Console > Jenkins > Manage Jenkins > Manage Plugins
- Click Check Now and make sure there is no error.
Artifactory (For NTLM Forward Proxy)
Note: This level of configuration is for Artifactory only, this proxy setting doesn't automatically apply on any other applications.
Steps (For NTML Forward Proxy Only)
Artifactory cannot communicate to proxy server that requires NTML Authentication. The solution is to force the JVM to enable "basic" authentication (Not NTML Authentication).
The solution to this problem is to modify the jenkins yml file:
vi $MYSTSTUDIO_HOME/conf/maven/docker-compose.yml
Add the following line after the Port definition:
environment:
JAVA_OPTS=-Dhttp.auth.preference="basic"
The Artifactory JVM will use basic authentication to the proxy, not NTLM authenication.
Once the yml file is modified, run /myst-studio/bin/restart.sh to bounce the artifactory container (This will also bounce all other docker containers).
Steps (For Any Forward Proxy)
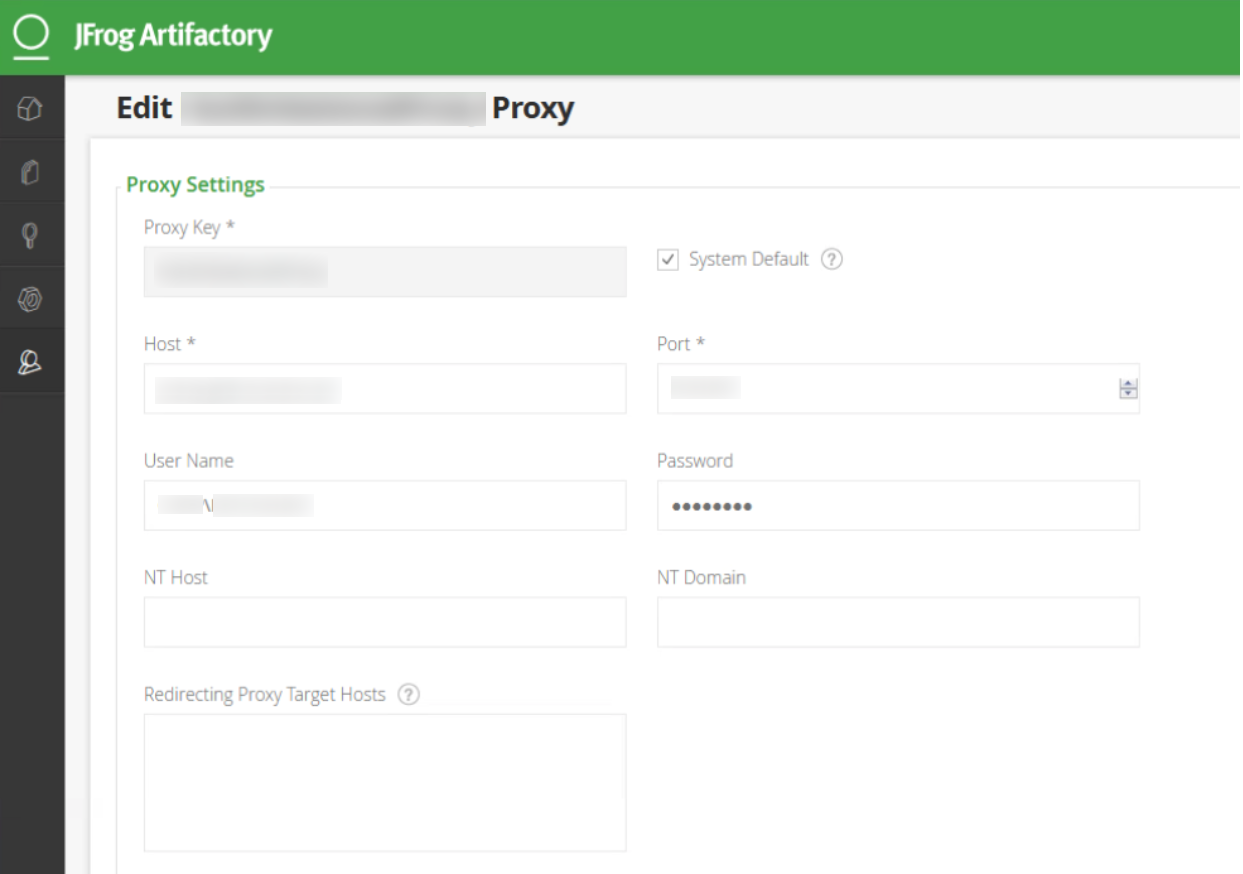
Provide the proxy configuration in the Artifactory console. For example:

Testing
Artifactory Console > Admin > Remote > Click on any Remote Repository (e.g. jcenter) > Click Test and make sure there is no error.
Maven
Note: This step isn't required if Artifactory is configured with Maven in settings.xml, because Artifactory will access Internet on behalf of Maven.
Steps
Add the below section to the global maven settings.xml file right after the root
<proxies>
<proxy>
<id>proxy</id>
<active>true</active>
<protocol>http</protocol>
<username><Domain>%5C<Username></username>
<password><Password></password>
<host><ProxyHost></host>
<port><ProxyPort></port>
<nonProxyHosts><NoProxy></nonProxyHosts>
</proxy>
</proxies>
Testing Prerequisite
Follow the below steps:
mkdir /tmp/TestMaven
vi pom.xml
Add the below content and save the file.
<project>
<modelVersion>4.0.0</modelVersion>
<groupId>com.mycompany.app</groupId>
<artifactId>my-app</artifactId>
<version>1</version>
</project>
Testing For Maven
Run run the following command to test Maven's Internet connectivity.
mvn -U -X clean install
Testing For Maven + Artifactory (If Artifactory is configured in Maven settings.xml)
Ensure you have configured Artifactory with Internet connectivity.
Run run the following command to test Maven's Internet connectivity via Artifactory.
mvn -U -X clean install